OCI O&M - Monitor Exadata Infrastructure using OCI Operations Insights Exadata Warehouse and Oracle Analytics Cloud
Introduction
As more organizations started Oracle Cloud Infrastructure Cloud journey, the importance of optimizing operational efficiency becomes paramount. In the blog, we will explore the configurations for monitoring the resource and performance of the Exadata infrastructure using Oracle Cloud Infrastructure Operations Insights feature Exadata Warehouse.
Capacity planning involves forecasting future resource needs and scaling infrastructure accordingly to avoid performance issues and ensure adepuate capacity for growth. By implementing these strategies, organizations can maximize the performance of their Exadata Cloud Service or Exadata Cloud@Customer solutions, resulting in improved uptime, faster performance, and efficient resource utilization.
Workload Management and Capacity Planning Strategies
- Exadata Capacity Planning using OCI Operations Insights Exadata Insights
- Exadata Workload Forecast and Analysis using OCI Analytic Cloud and Exadata Warehouse
- Performance management via OCI Database Management Service
ExaC@C Architecture
Exadata Cloud@Customer aka. ExaC@C is a one of most popular hybrid cloud solution among Oracle’s customers. It combines the best features from the Oracle cloud and keep customers’ on-prem requirements in mind. Customer can keep their data within the customers’ security perimeter while enabling the full out of box automoation from Oracle’s most powerful database platform.
Exadata Cloud@Customer embodies the concept of the Dom0 and DomU hypervisor concept to segregate cloud control plane from the users’ DomU domain space. Oracle Cloud Infrastructure has built in API endpoints and authentication and authorization security model to ensure customers’ data security without compromising on platform automation and operational efficiency.
Here is the Exadata Cloud @ Customer architecture: 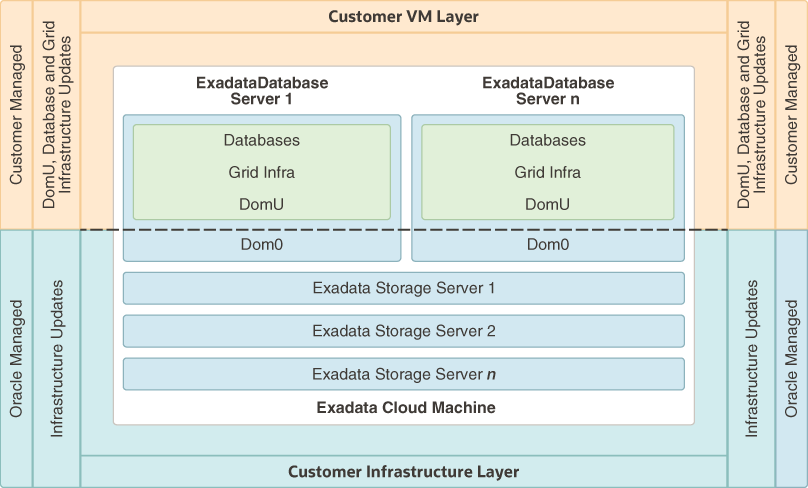
Many customers who have migrated to the ExaCC platforms raised the same request in terms of the ExaCC platform capacity and resource planning, especially on the OCPU and Storage to have accurate cloud cost impact analysis and prediction. The good news is that Oracle has the solution for the customers in OCI O&M - Operations Insights.
Operations Insights
Operations Insights is an OCI native service that provides holistic insight into database and host resource utilization and capacity.
Operations Insights consists of the following integrated applications, you can check out thte details about each feature here.
- Capacity Planning
- Oracle SQL Warehouse
- Exadata Insights
- ADDM Spotlight
- AWR Hub
- Enterprise Manager Warehouse
- Exadata Warehouse
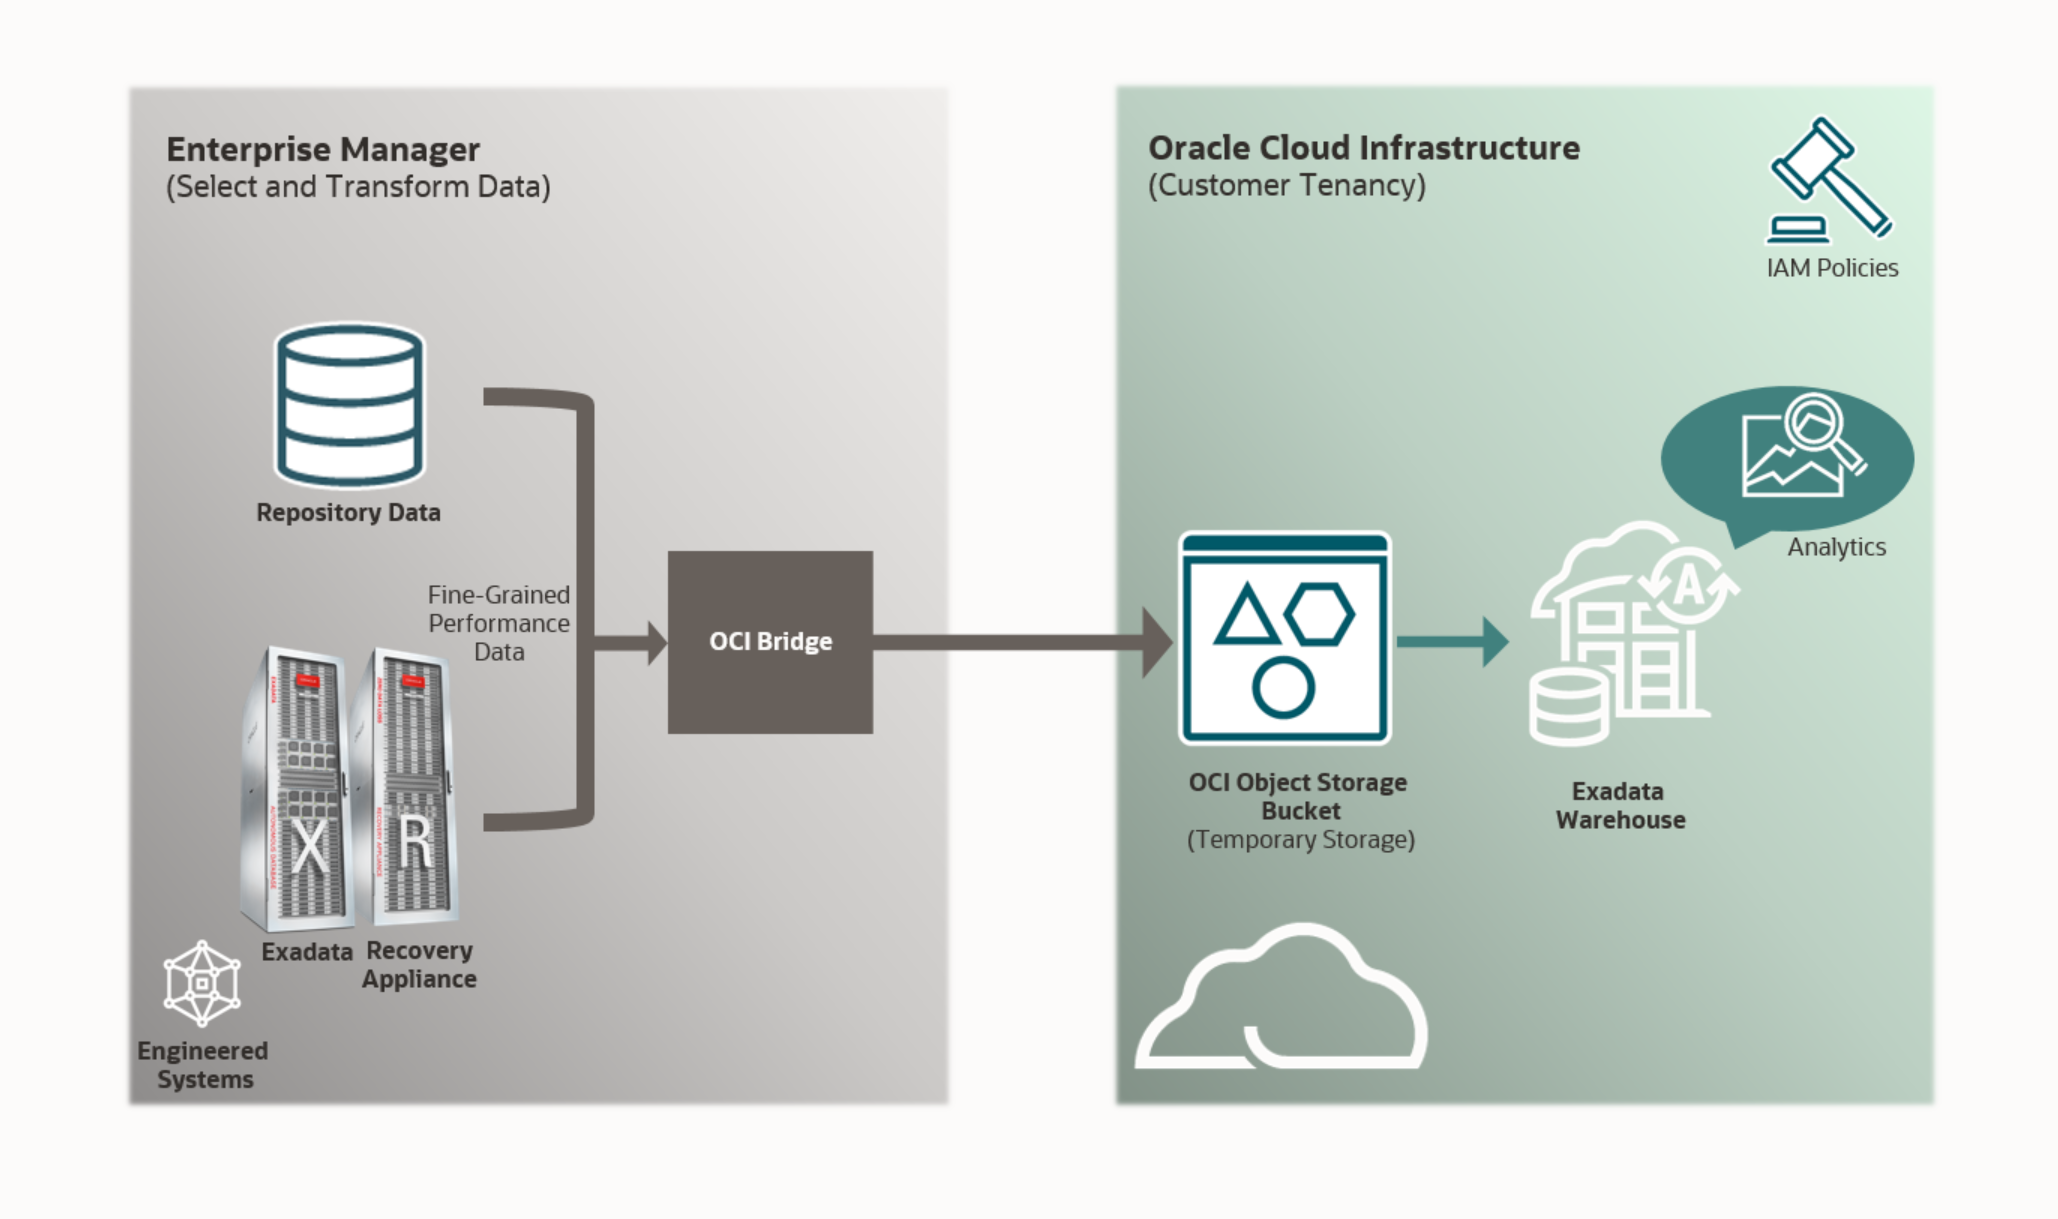
Enterprise Manager Cloud Bridge and OCI EM Bridge
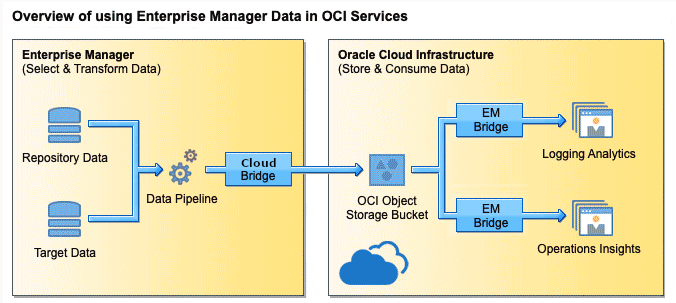
An Enterprise Manager-side bridge to move target-level data from Enterprise Manager and Exadata target level MS metrics to OCI Object Storage bucket. An Operations Insights-side bridge to move data from the OCI Object Storage bucket to Operations Insights for analysis.
Operations Insights features - Exadata Insights and Exadata Warehouse provide our Exadata customers the capabilities for capacity planning and Exadata workload forecast.
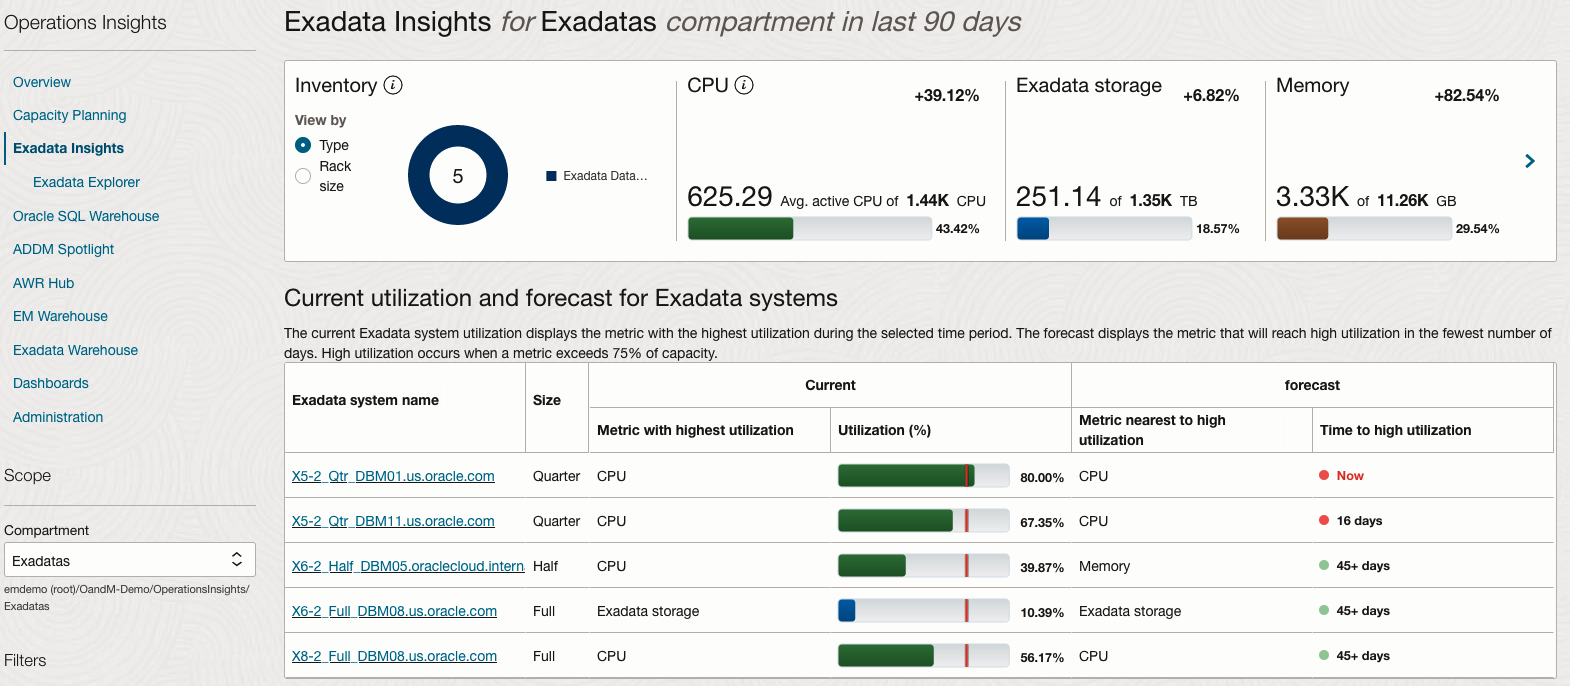
Exadata Insights
Exadata Insights help you analyze the resource utilization of the Exadata systems and identify the spare capacity for new workloads. This feature is available for Exadata systems that are managed by Oracle Enterprise Manager 13.5 RU01 and later.
Exadata Insights provides visibility into performance of critical workloads running on shared Exadata systems either cloud-based (Exadata Cloud Service) or monitored by Enterprise Manager (Exadata Database Service on Dedicated Infrastructure, Exadata Database Machine, and Exadata Cloud@Customer). A single integrated view of all Exadata systems across your enterprise helps identify issues and troubleshoot them quickly. You can also view the categorization of the Exadata systems based on the fleet type (Exadata Database Machine Bare Metal, Exadata Database Machine Virtualized, Exadata Cloud@Customer, or Exadata Database Service on Dedicated Infrastructure), rack type, the systems with low resource utilization, and the global resource usage in terms of CPU, memory, I/O, and storage.
Exadata Warehouse
Exadata Warehouse provides intelligent analytics that let you maximize performance and utilization for both on-premises and cloud-based Oracle Engineered Systems, such as Exadata Database Machine.
Exadata Warehouse functions as a long-term storage repository for fine-grained performance and utilization metrics from both on-premises and cloud-based Oracle Engineered Systems monitored by Enterprise Manager Cloud Control.
Prerequisits of using Exadata Warehouse
- EM Side: ExaC@C Exadata Infrastructure is discovered within EM
NOTE: Alfredo Krieg has a great blog post about discovering Exadata Cloud@Customer within Enterprise Manager 13.5, please check here
- Set up OCI service connectivity.
- OCI Side: Ensure an OCI Object Storage Bucket has already been created
- EM Side: Define a Global Named Credential in Enterprise Manager for OCI
- EM Side: Define a Host Preferred Credentials for all Database Machine Monitoring Agent hosts and OMS host
- EM Side: Set up an exclusive Enterprise Manager Super Administrator user for the Enterprise Manager login
- EM Side: Create an Enterprise Manager group containing the targets for which you want data exported
- OCI Side: Set up the requisite OCI Policies needed for Enterprise Manager to push data into Object Storage
- OCI Side: Provision Autonomous Data Warehouse (ADW) and create an Analytics User to hold the Analytics Schema.
- EM Side: Discover the ADW on EM.
- EM Side: If you are using CellCli to monitor the database machine storage servers, then we recommend that you switch to using REST API for monitoring.
- EM Side: Configure the Cloud Bridge
- OCI Side: Configure EM Bridge
- OCI Side: Kick off the Data Export
- OCI Side: Verify the Exadata Warehouse data in ADW database
- OCI Side: Create Oracle Analytics Cloud
Let’s start with the prerequisites from the OCI side!
OCI Side: Create OCI service user
- Under Identity & Security, select Identity -> Users
- Create new serivce user, for example emcloudbridge
- Under Identity & Security, select Identity -> Groups
- Create new service user group, for example emcloudbridgegroup
- Grant Permissions required for configuraion of Cloud Bridge, EM Bridge, Object Storage, Operations Insights
- An example of the policy for the emcloudbridgegroup
Allow group emcloudbridgegroup to manage buckets in compartment exacc9vm1 Allow group emcloudbridgegroup to manage buckets in compartment exacc9vm1 Allow group emcloudbridgegroup to manage objects in compartment exacc9vm1 Allow group emcloudbridgegroup to manage objects in compartment exacc9vm1 Allow service dbx-dev to read objects in compartment exacc9vm1 Allow service dbx-dev to read objects in compartment exacc9vm1 Allow group emcloudbridgegroup to manage database-family in compartment exacc9vm1 - Use the OpenSSL command to generate key pair in required PEM format on Linux, for example
openssl genrsa -out ~/.oci/oci_api_key.pem 2048 chmod go-rwx ~/.oci/oci_api_key.pem openssl rsa -pubout -in ~/.oci/oci_api_key.pem -out ~/.oci/oci_api_key_public.pem cat ~/.oci/oci_api_key_public.pem | pbcopy - Create API key for the service user, under Identity -> Users, select emcloudbridge user
- Under Resources, select API Keys
- Select Add API Key and provide public key file location or paste the public key content
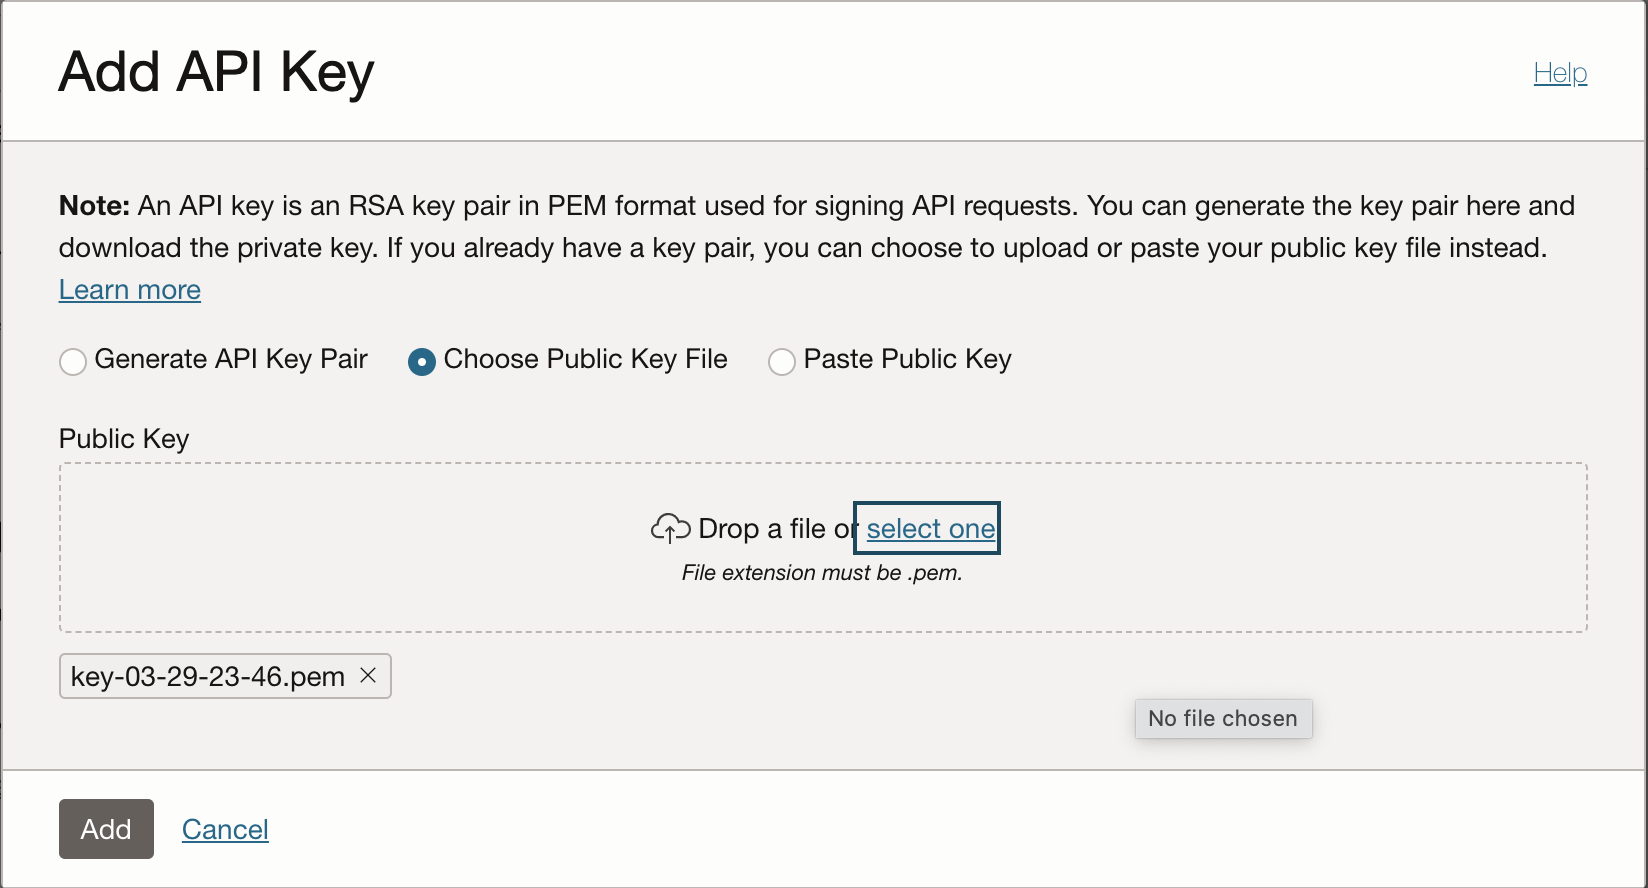
- Copy and save the fingerprint for later use
IMPORTANT: in order to create compatible API key between OCI and EM, we can follow document
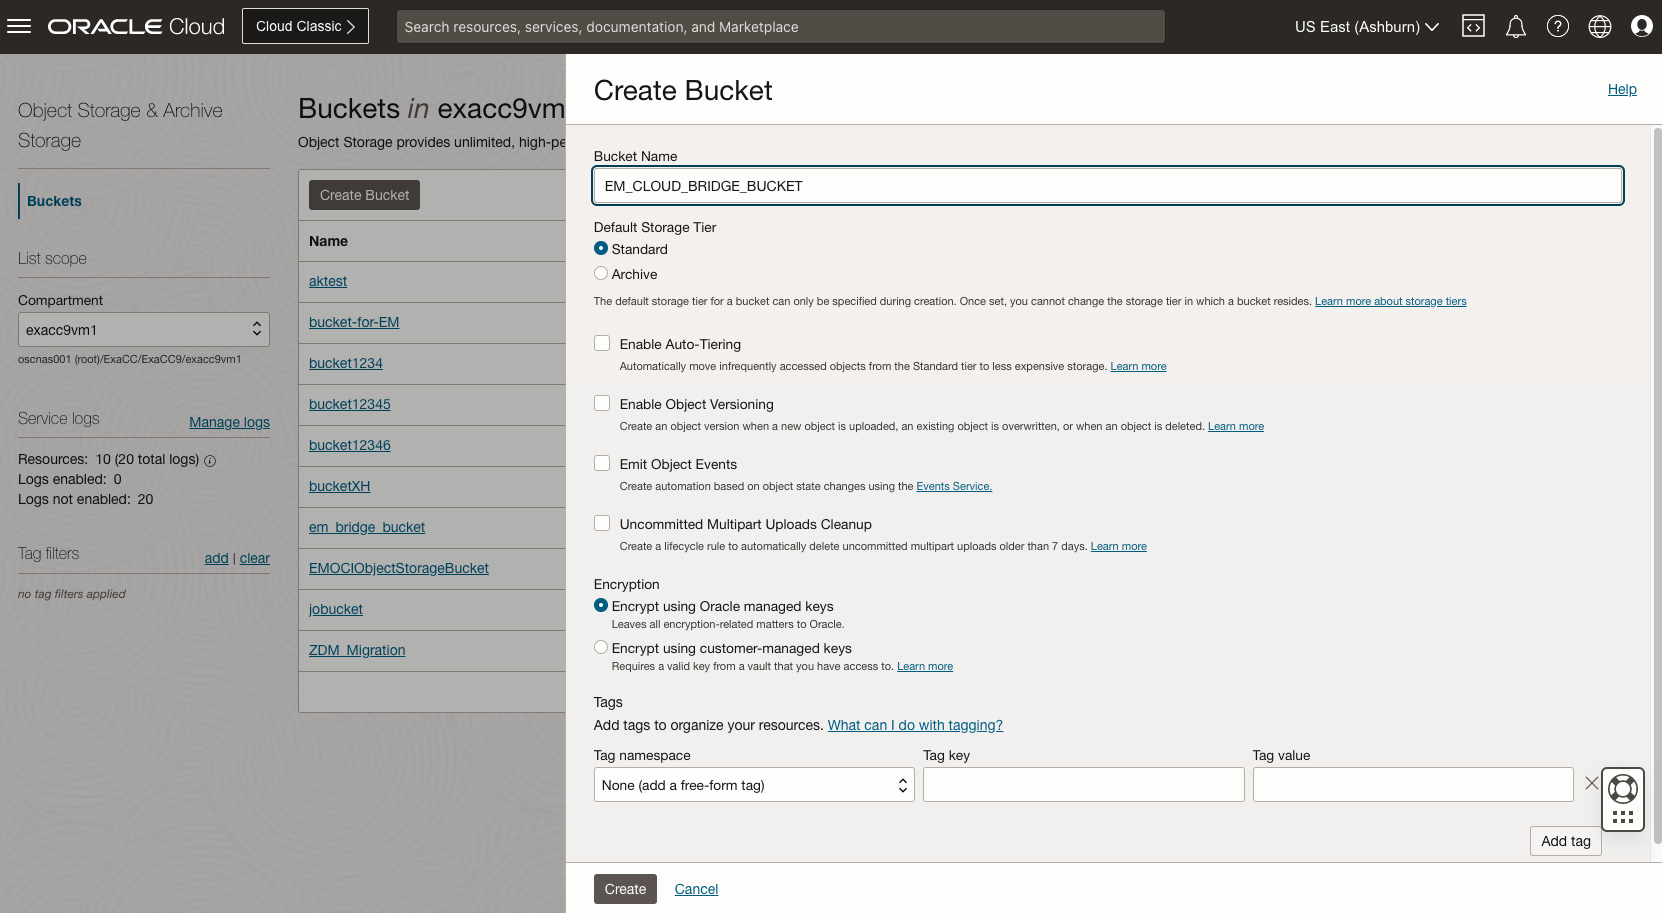
OCI Side: Create an OCI Object Storage Bucket
- From Storage menu, select Object Storage & Archive Storage
- Create Bucket
- Select Standard Tier and Encrypt using Oracle managed keys
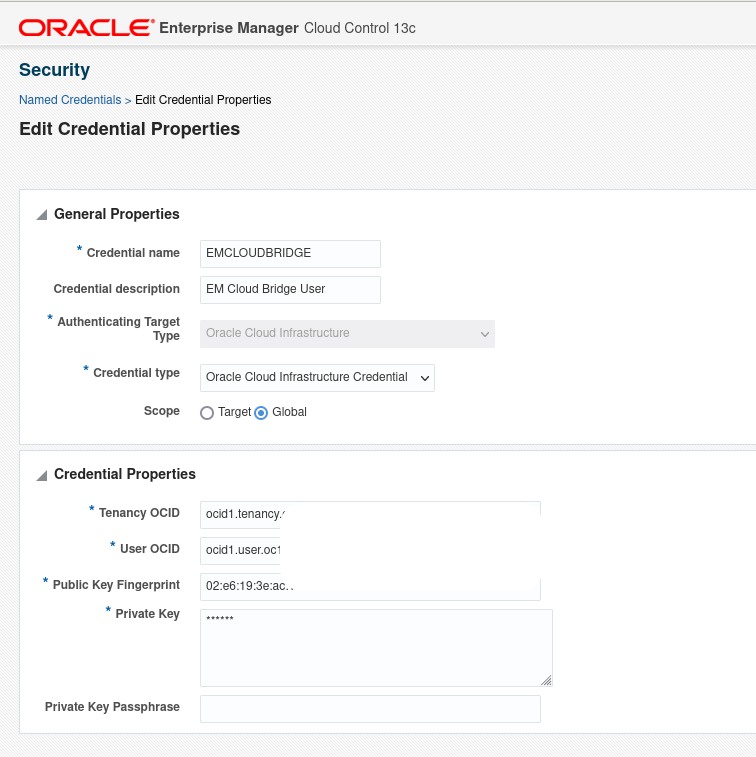
EM Side: Define a Global Named Credential in Enterprise Manager for OCI
- From the Setup menu, choose Security and then Named Credentials
- Use the private key, public key fingerprint and tenancy and user ocid to create the Named Credential to connect to OCI
EM Side: Define a Preferred Credentials for Agent hosts and OMS host
- Under Security, click Preferred Credentials and select Host.
- Set Normal Host Credential and Privileged Host Credential (REST API credential used for compute node).
- For the OMS host, set credentials of the user.

EM Side: Create and Test REST API for Storage and Compute nodes
- Create REST API user for compute nodes
dbmcli -e 'CREATE ROLE monitor; GRANT PRIVILEGE list ON ALL OBJECTS ALL ATTRIBUTES WITH ALL OPTIONS TO ROLE monitor;' dbmcli -e 'create user restapi_user password=your_password'; dbmcli -e 'grant role monitor to user restapi_user'; - Cell Storage servers access is in Dom0, so we need to set server credentials to use REST API to access the cell storage metrics See More Details in Discover the Exadata Database on Cloud@Customer Target Using Console Configure RESTful API for monitoring Exadata Storage Server
- Test REST API with cell storage server
$ curl -k -u cloud_user_cluclu062f2:xxxxxxxxxxxxx https://10.0.10.10/MS/RESTService?cmd=list%20metrichistory%20CD_IO_LOAD CD_IO_LOAD FD_02_iad160204exdcl04 0.0 2023-04-16T16:00:35+00:00 CD_IO_LOAD CD_00_iad160204exdcl04 0.0 2023-04-16T16:00:35+00:00 CD_IO_LOAD CD_02_iad160204exdcl04 0.0 2023-04-16T16:00:35+00:00 CD_IO_LOAD CD_04_iad160204exdcl04 0.0 2023-04-16T16:00:35+00:00 CD_IO_LOAD CD_05_iad160204exdcl04 0.0 2023-04-16T16:00:35+00:00 CD_IO_LOAD CD_06_iad160204exdcl04 0.2 2023-04-16T16:00:35+00:00 CD_IO_LOAD CD_08_iad160204exdcl04 0.0 2023-04-16T16:00:35+00:00 CD_IO_LOAD CD_10_iad160204exdcl04 0.0 2023-04-16T16:00:35+00:00 - Test REST API with compute node
$ curl -k -u restapi_user:xxxxxxxxxxxxx http://10.0.10.9:7879/MS/RESTService?cmd=list%20metrichistory%20DS_CPUT%20where%20ageInMinutes < 10
   DS_CPUT	 ecc9c1n1	 6.3 %	 2023-04-29T03:07:14+00:00
   DS_CPUT	 ecc9c1n1	 5.8 %	 2023-04-29T03:08:14+00:00
   DS_CPUT	 ecc9c1n1	 0.0 %	 2023-04-29T03:09:14+00:00
   DS_CPUT	 ecc9c1n1	 37.6 %	 2023-04-29T03:10:14+00:00
   DS_CPUT	 ecc9c1n1	 28.2 %	 2023-04-29T03:11:14+00:00
   DS_CPUT	 ecc9c1n1	 28.5 %	 2023-04-29T03:12:14+00:00
   DS_CPUT	 ecc9c1n1	 37.2 %	 2023-04-29T03:13:14+00:00
   DS_CPUT	 ecc9c1n1	 45.9 %	 2023-04-29T03:14:14+00:00
   DS_CPUT	 ecc9c1n1	 33.2 %	 2023-04-29T03:15:14+00:00
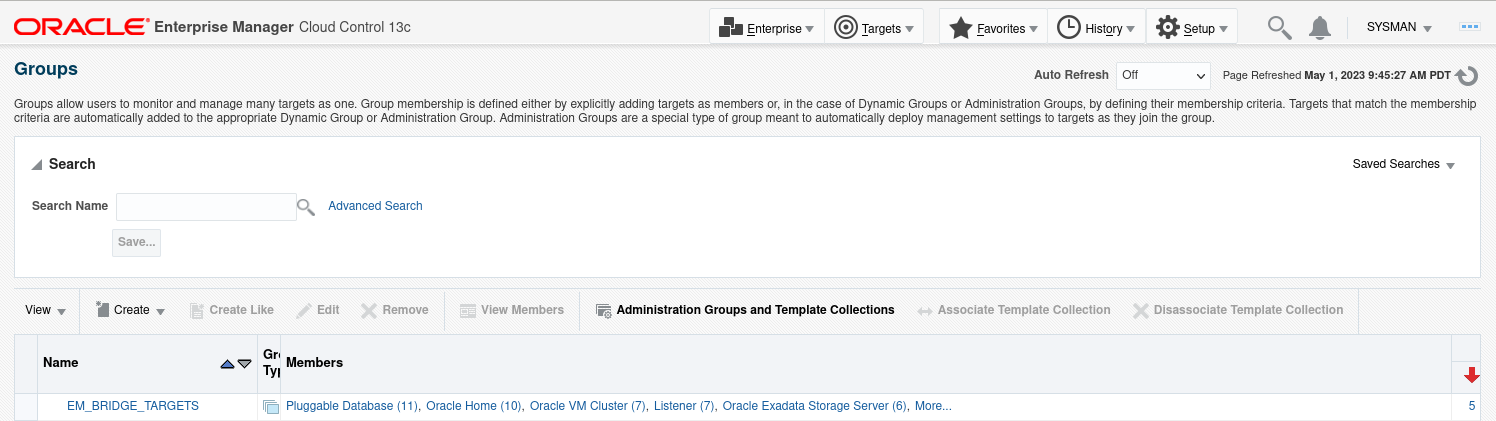
EM Side: Create an Enterprise Manager group containing the targets for which you want data exported
- From the Target menu, select Groups. The Groups page opens
- Click Create and select Group
- Select Targt type Oracle Exadata Infrastructure to be added to the group

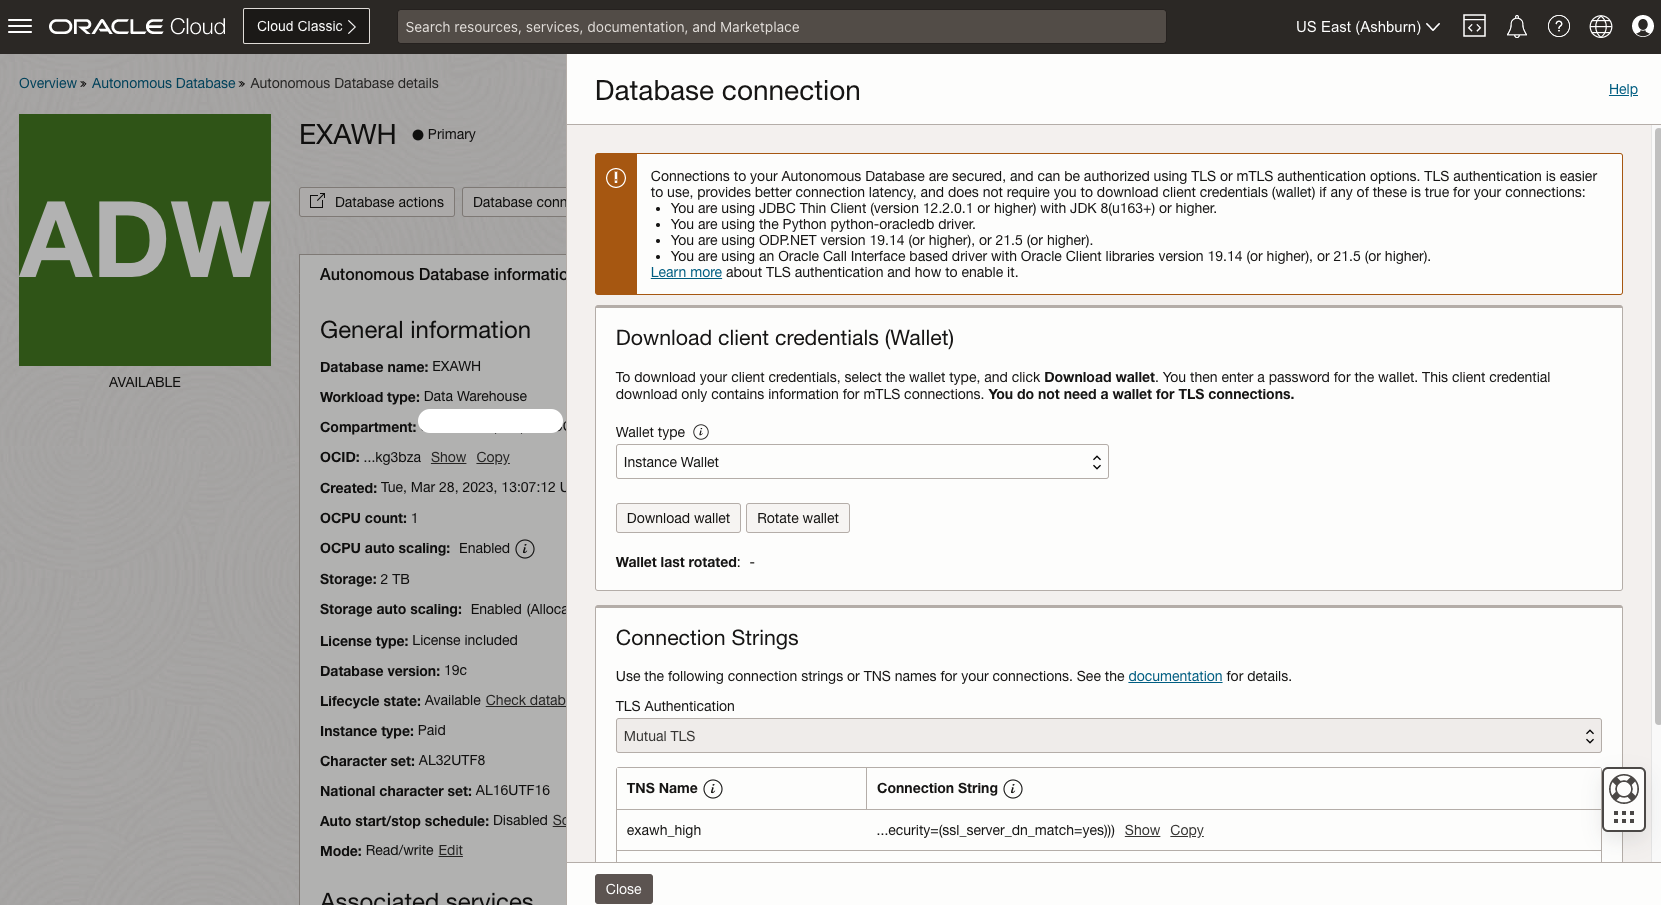
OCI Side: Provision Autonomous Data Warehouse (ADW) and create an Analytics User to hold the Analytics Schema
- Go to OCI tenancy console
- Oracle Database -> Autonomous Database
- Create Autonomous Database
- Select Data Warehouse type database
- Configure proper network access make sure your EM can discover the ADW database
- Once the ADW is created, click Database connection, download the wallet for connection
- Go to Database Actions
- In Administration, select Database Users
- Create User - EMCLOUDBRIDGE
Some considerations when onboarding Autonomous Databases to Oracle Enterprise Manager Deployed in OCI or on-prem
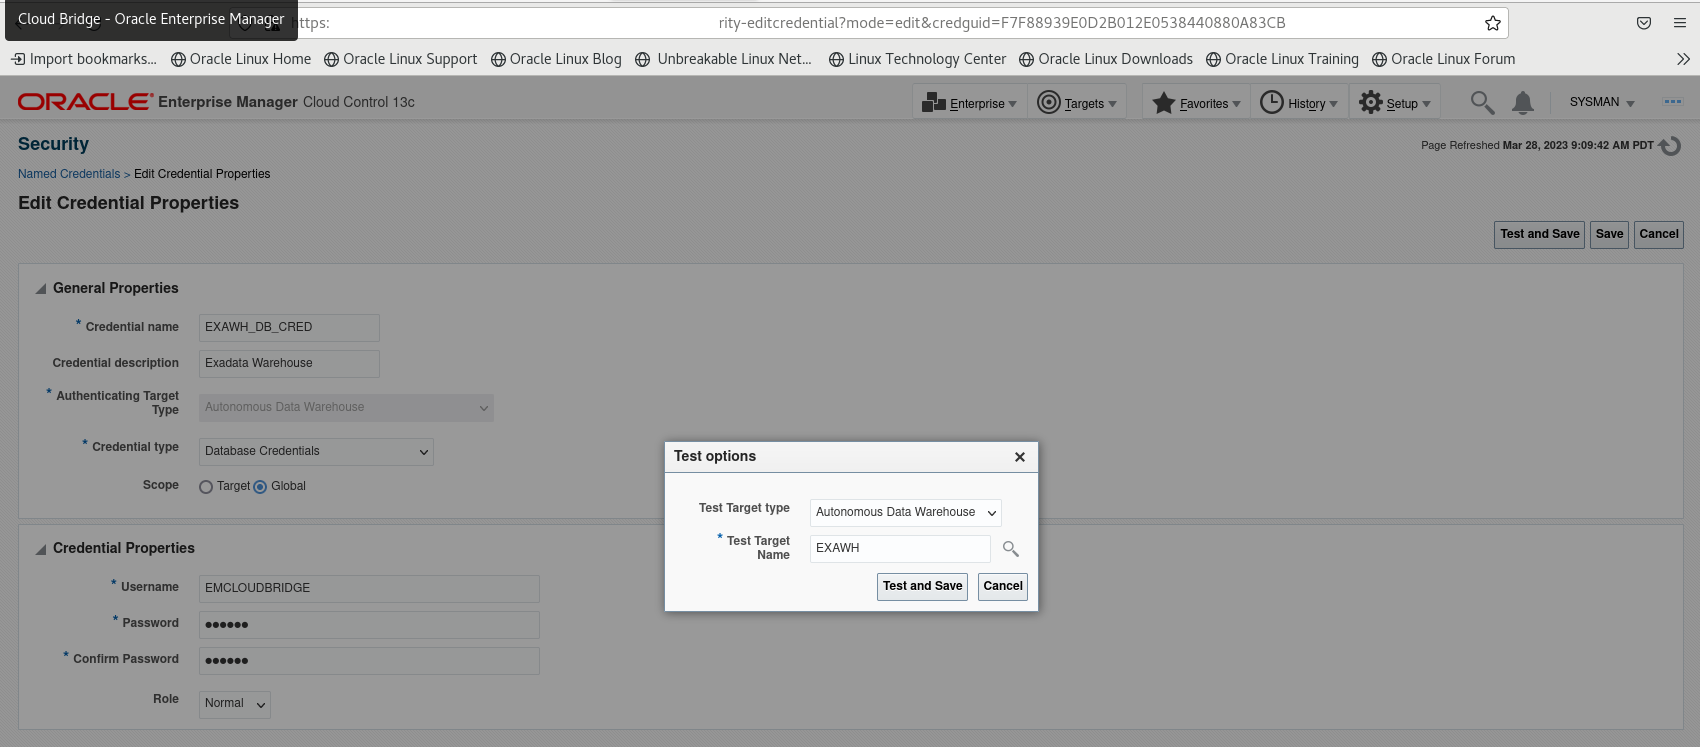
EM Side: Discover the ADW on EM
- Under EM Secuirty, select Named Credentials. Create a new named credential with for EMCLOUDBRIDGE user within the ADW
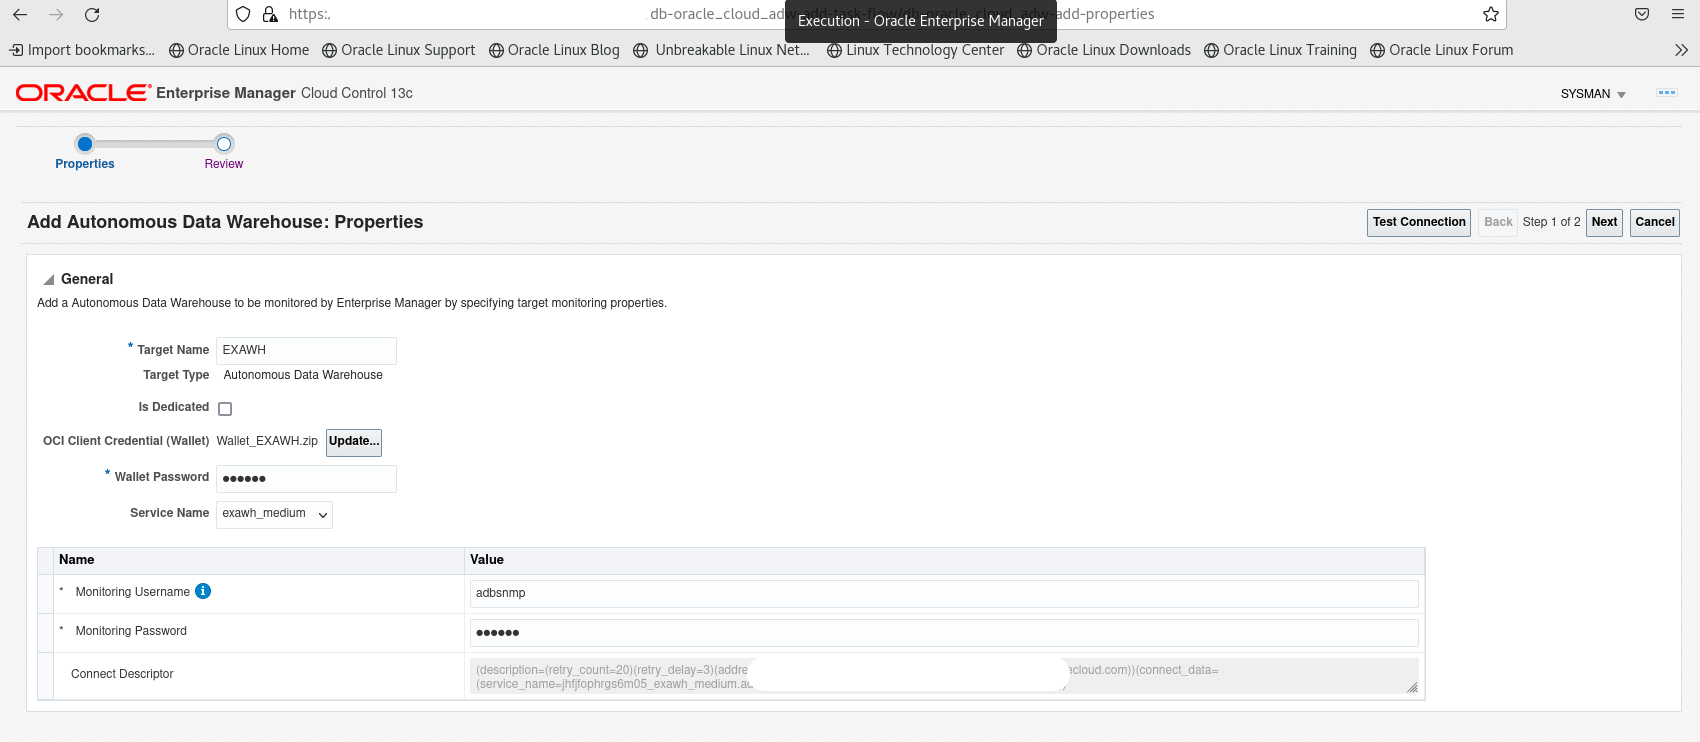
- Onboard ADW to EM target
- From Setup menu, select Add Target, Add Targets Manually
- Add Non-Host Targets Manually
- Select Autonomous Data Warehouse as Target Type
- Provide Target Name, Wallet and Wallet Password
-
Verify the connection string for the ADW
More Details check EM 13.5 documentation to discover Autonomous Database
EM Side: Configure the Cloud Bridge
- From Setup menu, select Cloud Bridge
- Click Manage OCI Connectivity and select OCI Bridge tab
- Sepcify OCI Credeitials we created to connect to OCI, the base URL for the storage bucket(for example: objectstorage.us-ashburn-1.oraclecloud.com), the storage bucket name and the OCI Cloud Bridge name
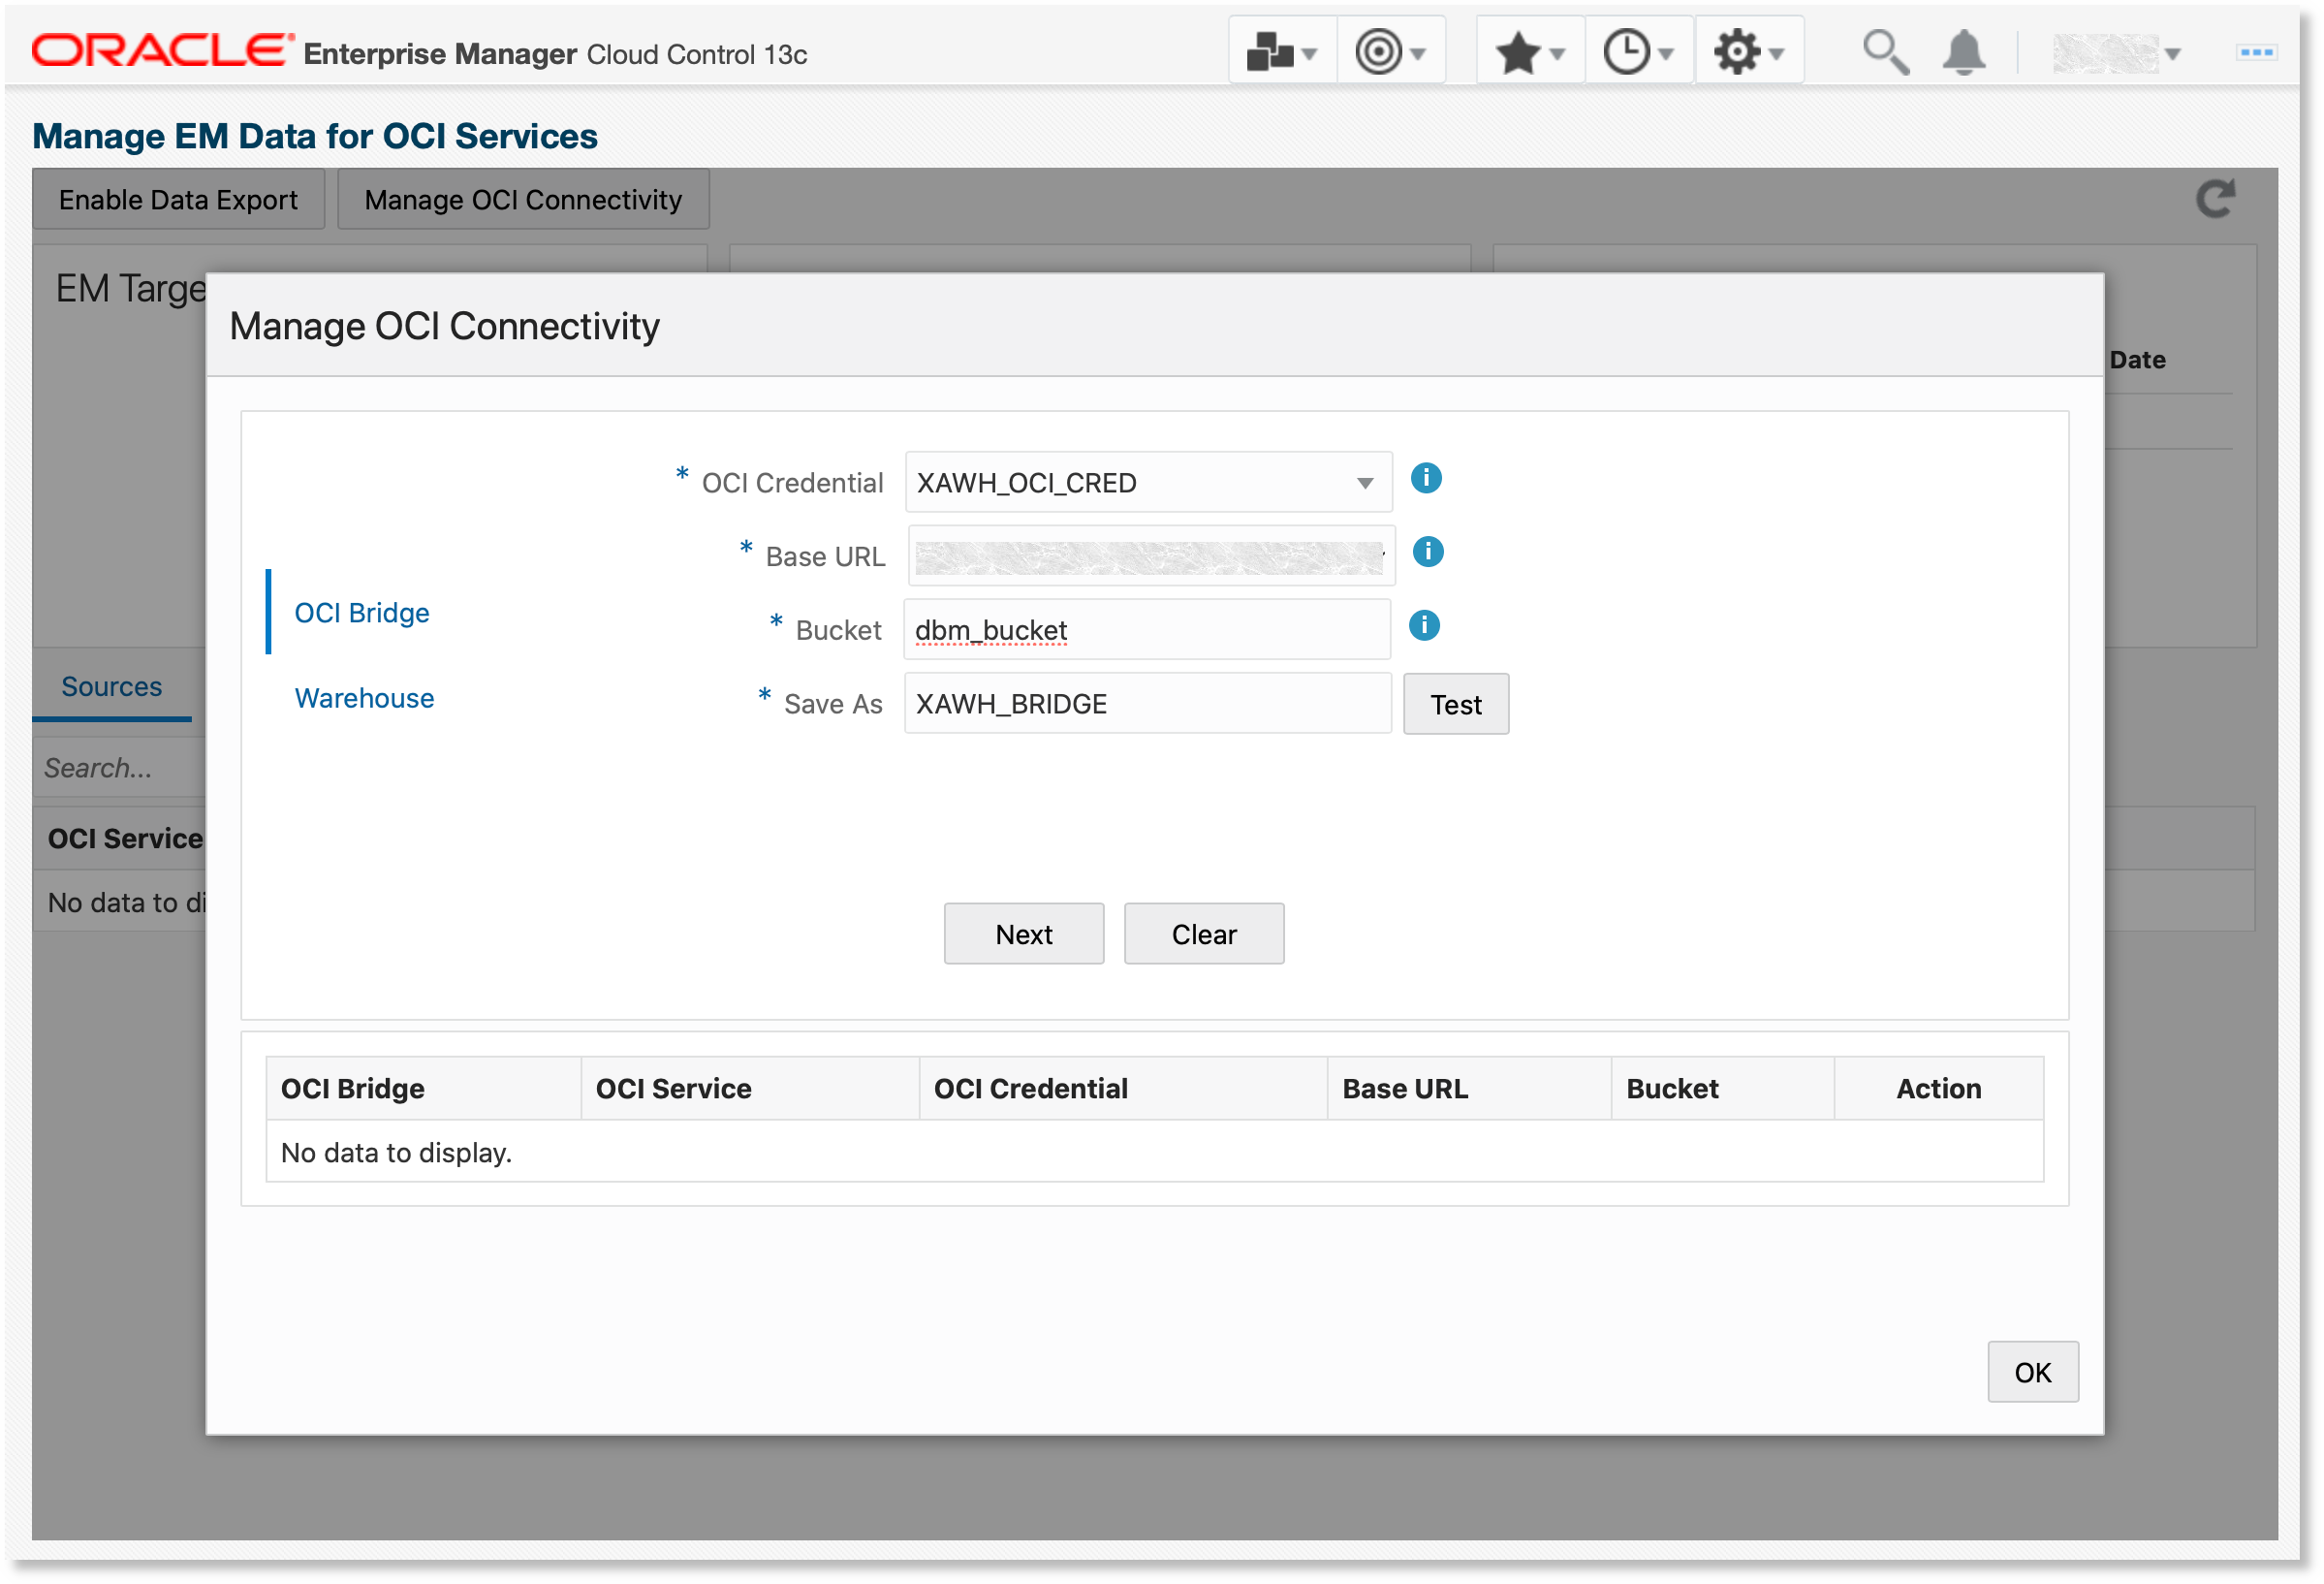
- Create the OCI Bridge
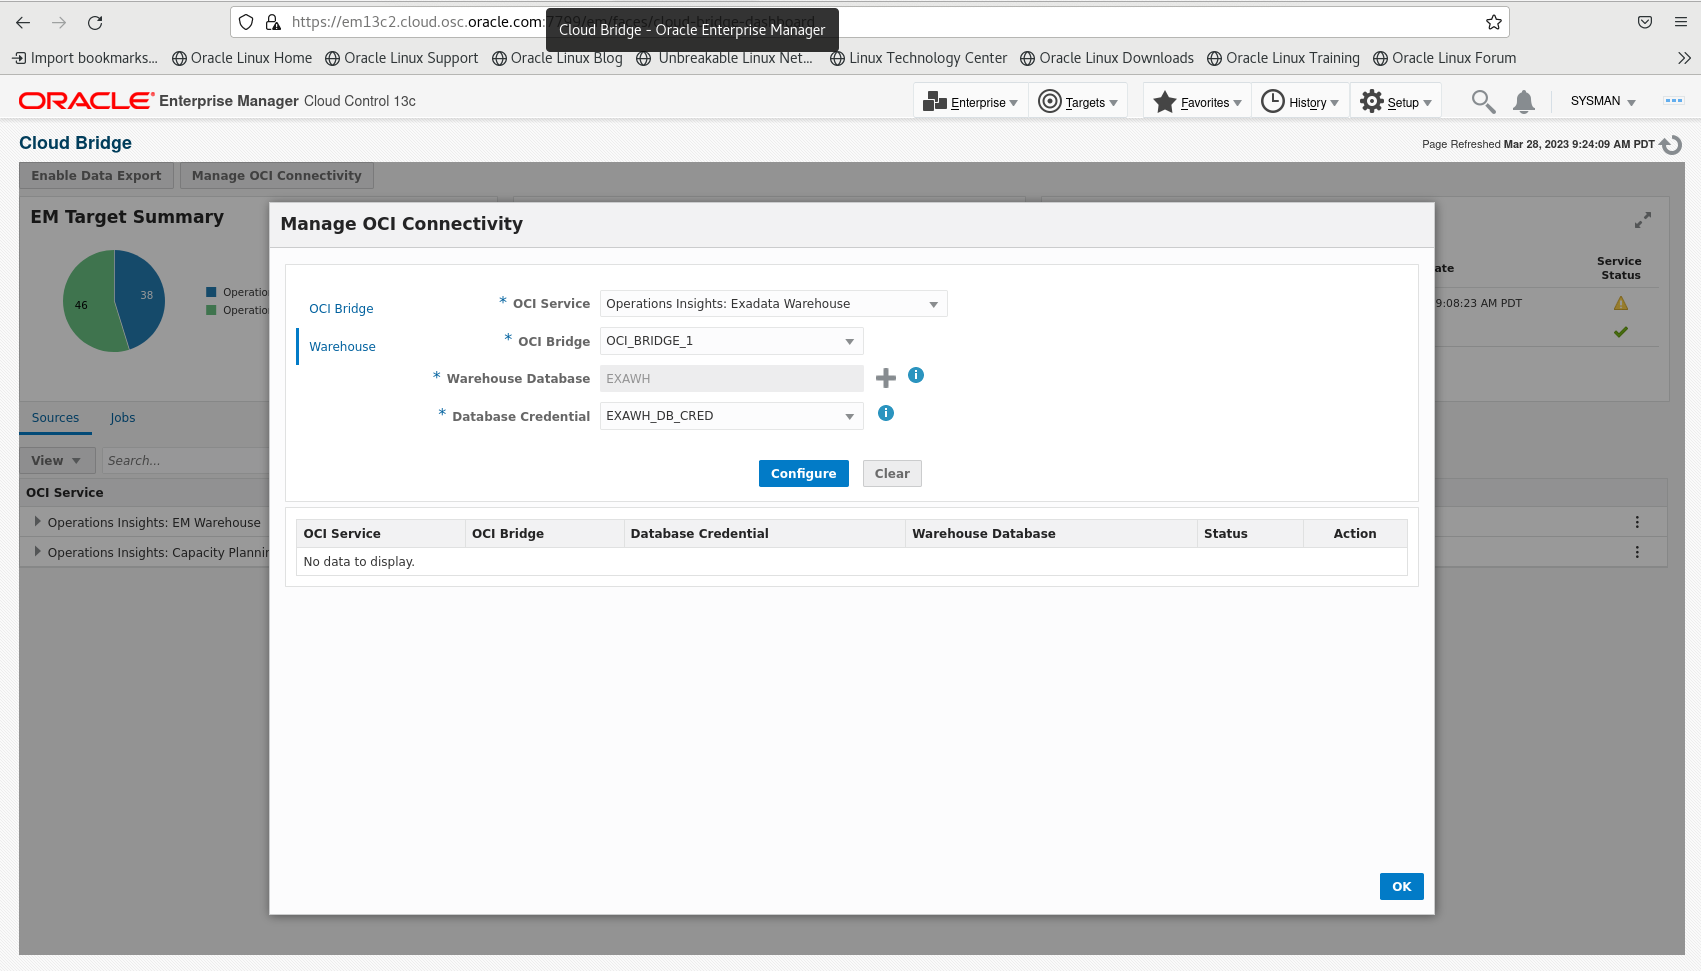
- Click Warehouse tab, specify OCI Service - Operations Insights: Exadata Warehouse, OCI Bridge you had created. The Autonomous Data Warehouse you had discovered and the database credential to access the ADW database
EM Side: Kick off the Data Export
- Now return to Cloud Bridge page and select Enable Data Export
- Specify OCI Service - Operations Insights: Exadata Warehouse and EM target group as the Source as well as the OCI Bridge we had created
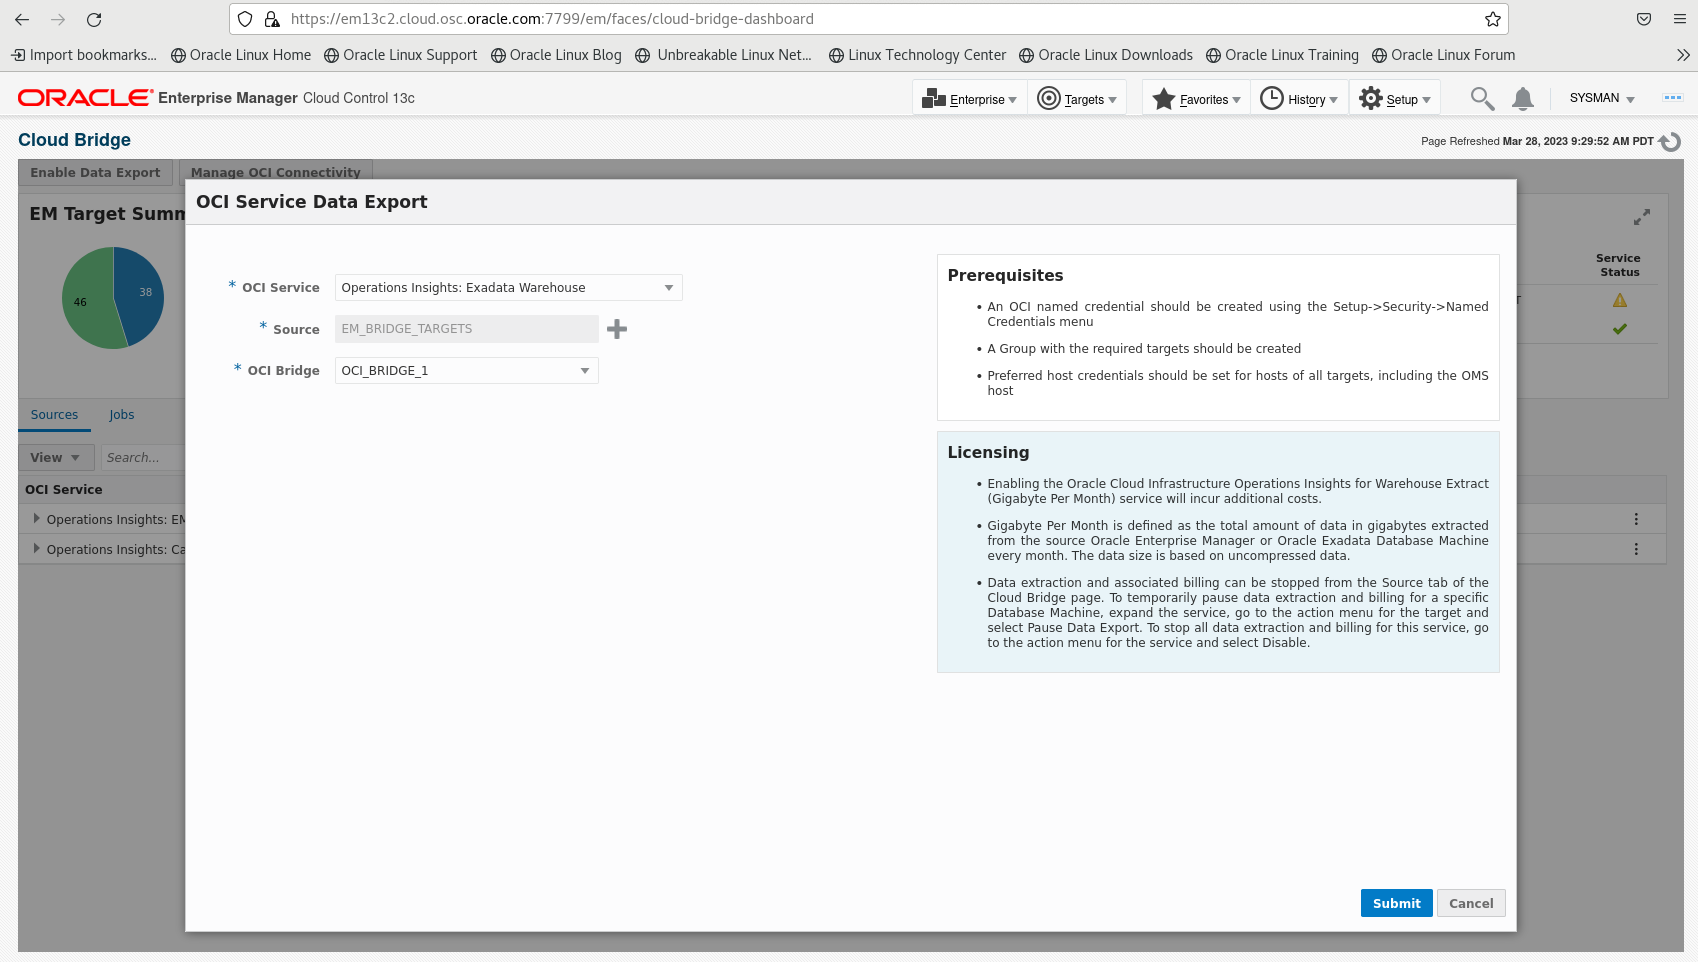
- Click the Submit button to enable the data export. The data from your EM instance should start uploading to the OCI bucket you speicified.
OCI Side: Verify the Exadata Warehouse data in ADW database
- Cloud Bridge page shows the basic status about the Operations Insights jobs
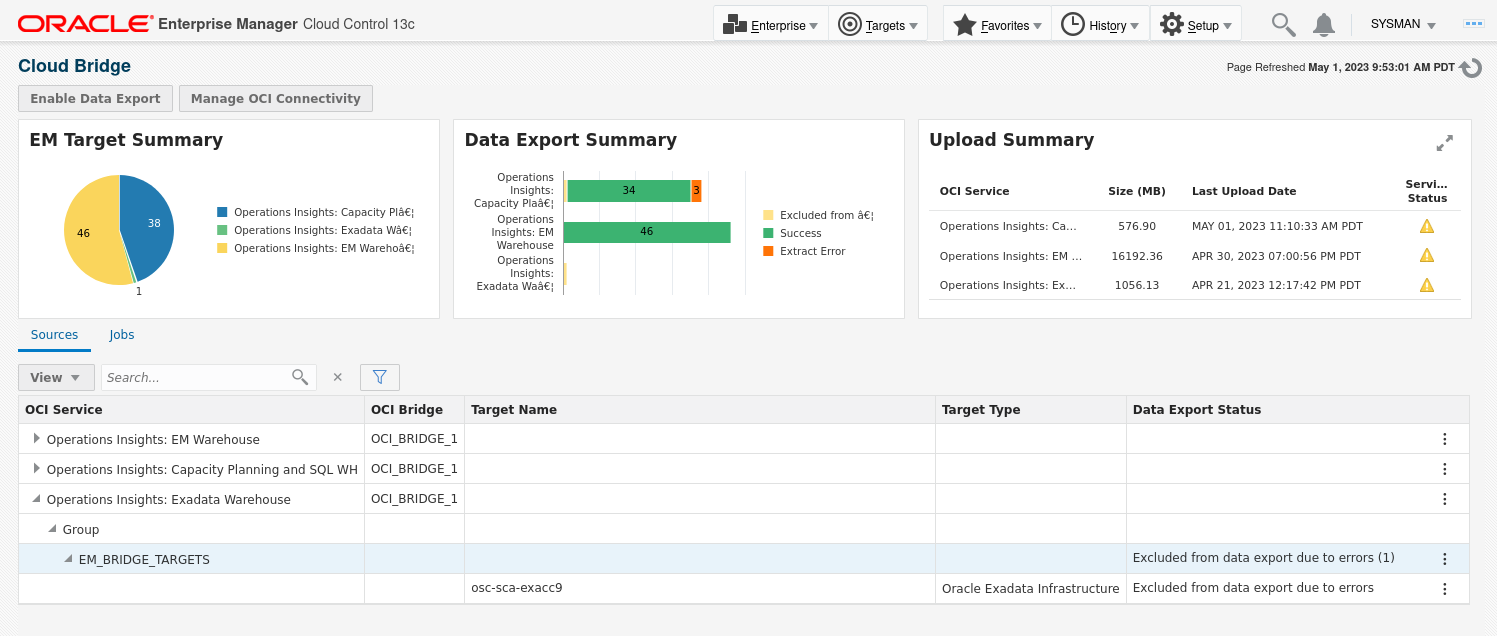
- Check the job details, select Jobs tab and pick the Operations Insights: Exadata Warehouse, adjust the time window accordingly
- GEF_EXTRACT_MAIN_XAWH framework is the top level job for Exadata Warehouse collection

- GEF_EXTRACT_MAIN_XAWH extracts EM target group OMS information to OCI Object Storage and triggers the load job to collect and load additional target metrics into ADW database
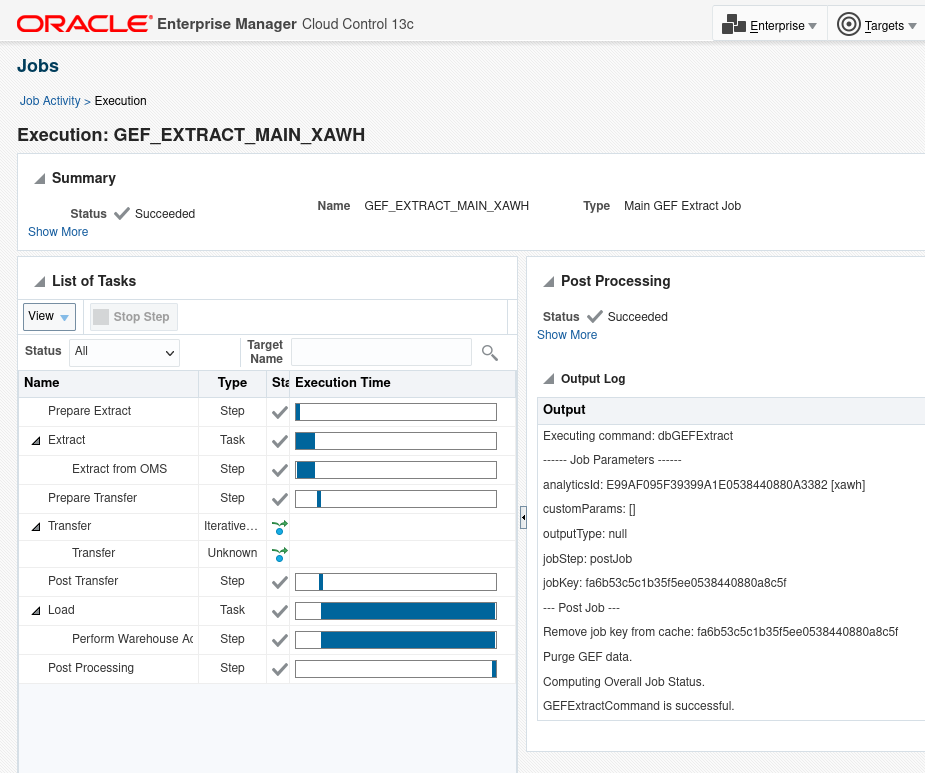
- oracle.sysman.xa.analytics.gef.XaLoader framework is responsible to start the additional metrics collection and the ETL job
- Under Enterprise menu, Provisioning and Patching, select Procedure Activity, you can find the procedure jobs related to XAWHDataCollection
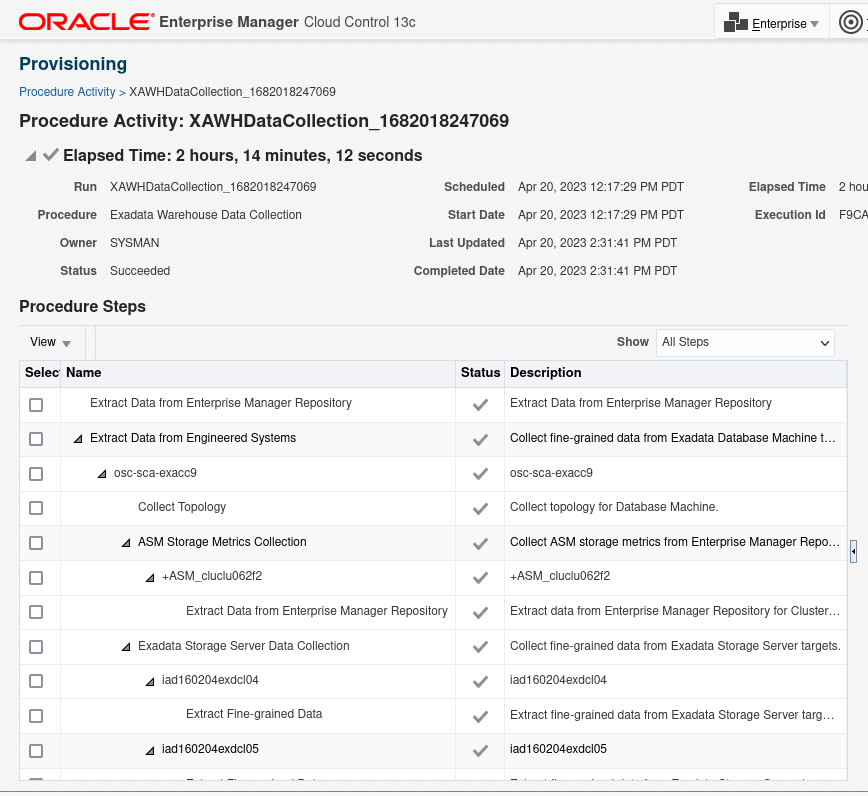
- You can also find ExadataAnalytics procedures which is responsible for running ML model to forecast Exadata infrastrcuture resource usage
OCI Side: Create Oracle Analytics Cloud instance for data visualization
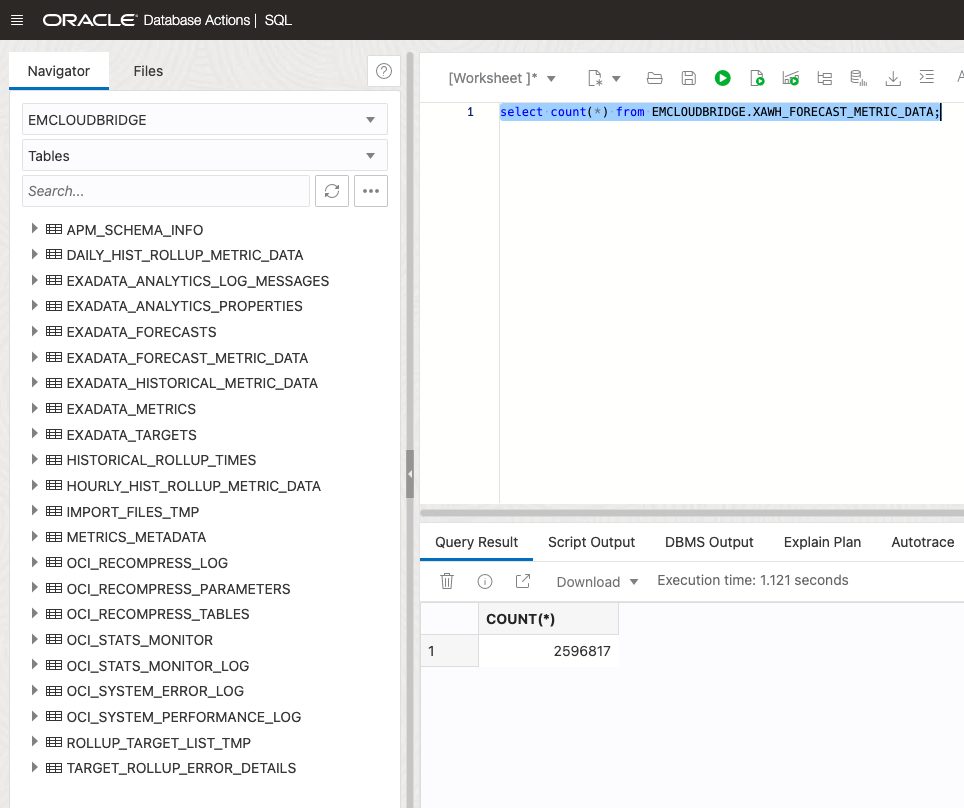
- Once the data is fully loaded into ADW, we can access ADW Database via Database Actions SQL Worksheet or via SQL Developer. You can refer to Jeff Smith blog to get more details about SQL Worksheet
- or even use SQL Developer Web
- Inspect the ADW Exadata Warehouse tables and views
- In order to visualize the metrics and forecast data better, we can utilize Oracle Analytics Cloud for data analysis and visulization.
- Under OCI Analytics & AI, select Analytics Cloud
- Create Instance
- Specify the name and capacity as well as license and edition information, click Create to create your OAC instance
- Once the instance is created, click Analytics Home Page to access OAC
Find more Exadata Warehouse view definition and metadata here
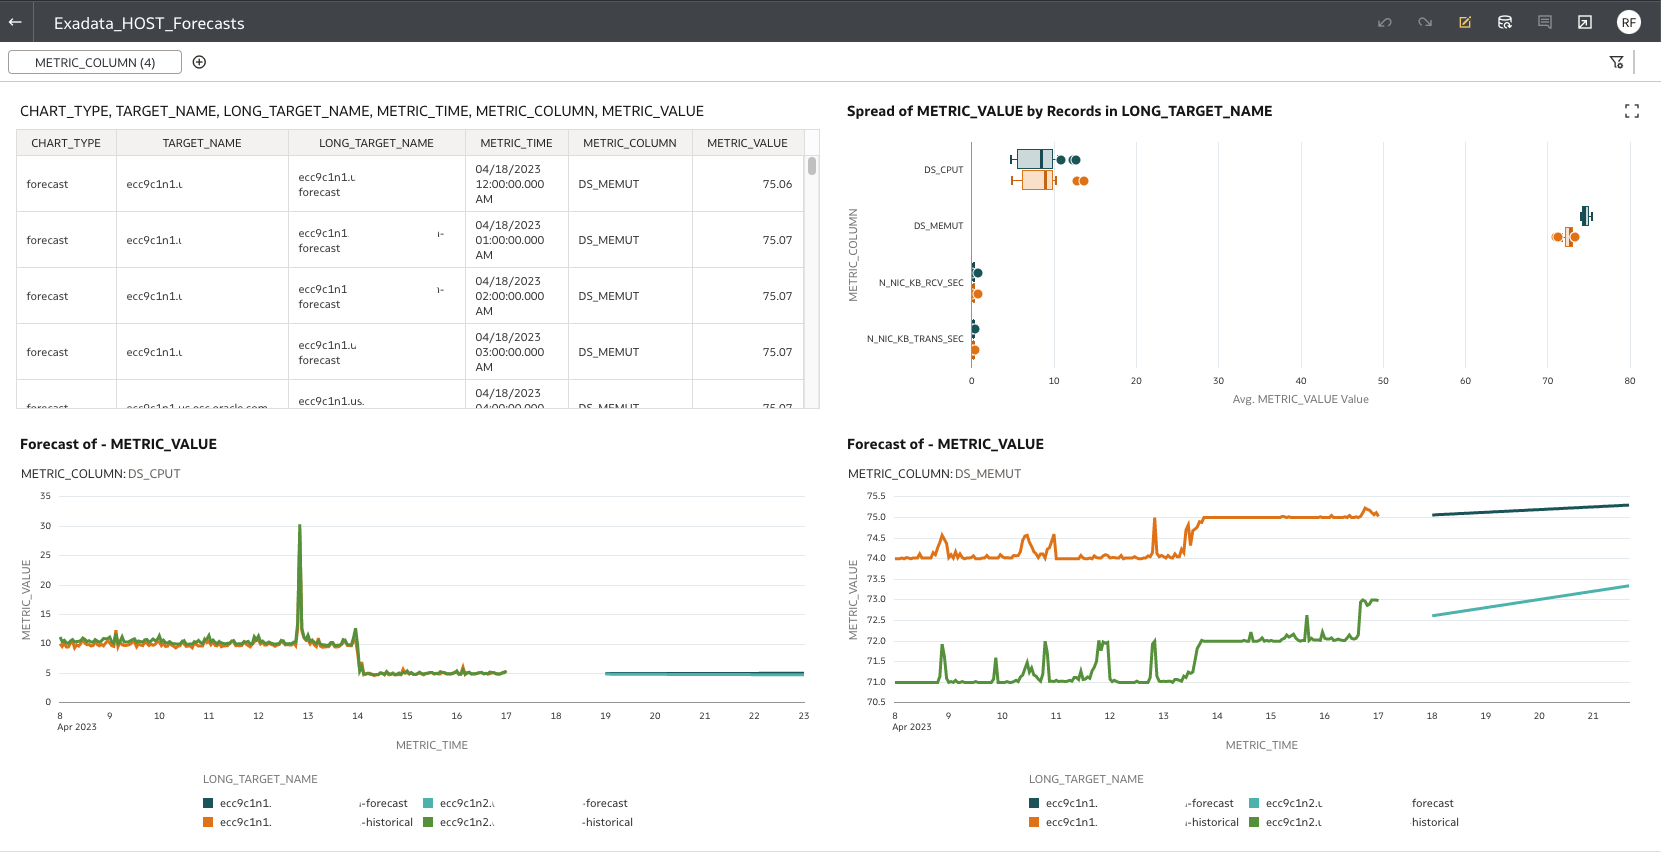
OCI Side: Visualize the Exadata Warehouse Forecast data via OAC
- Click Create Connection in OAC to create ADW database connection
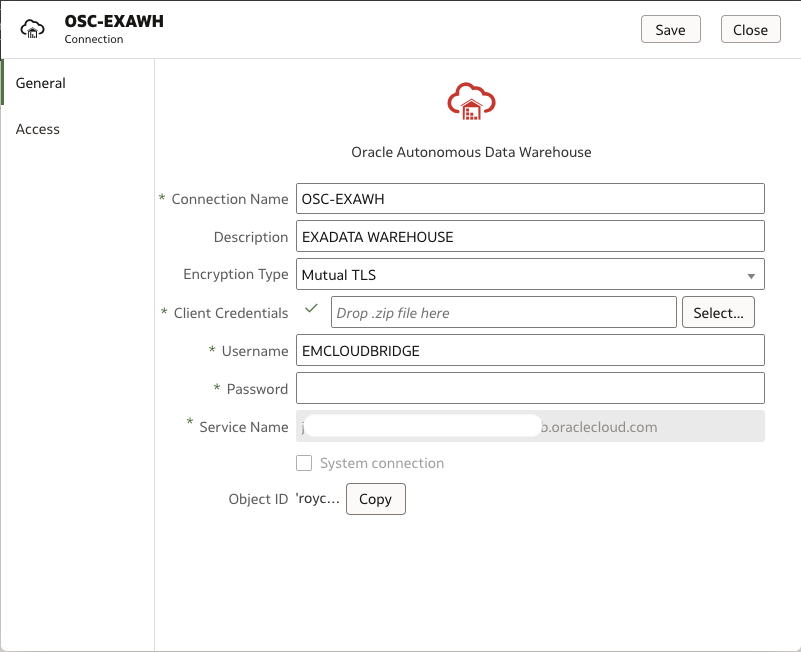
- After ADW database connection is created, dataset needs to be created.
- You can consider to create a user defined view before creating the dataset so that you don’t need to join/create complex SQL within OAC.
- Finally, you can create OAC Workbook to visualize your data
- Check out the OAC documentation about the best practics of visualizing your data and building the dashboard
- Tip: check out the ideas icon to find some out of box visualization
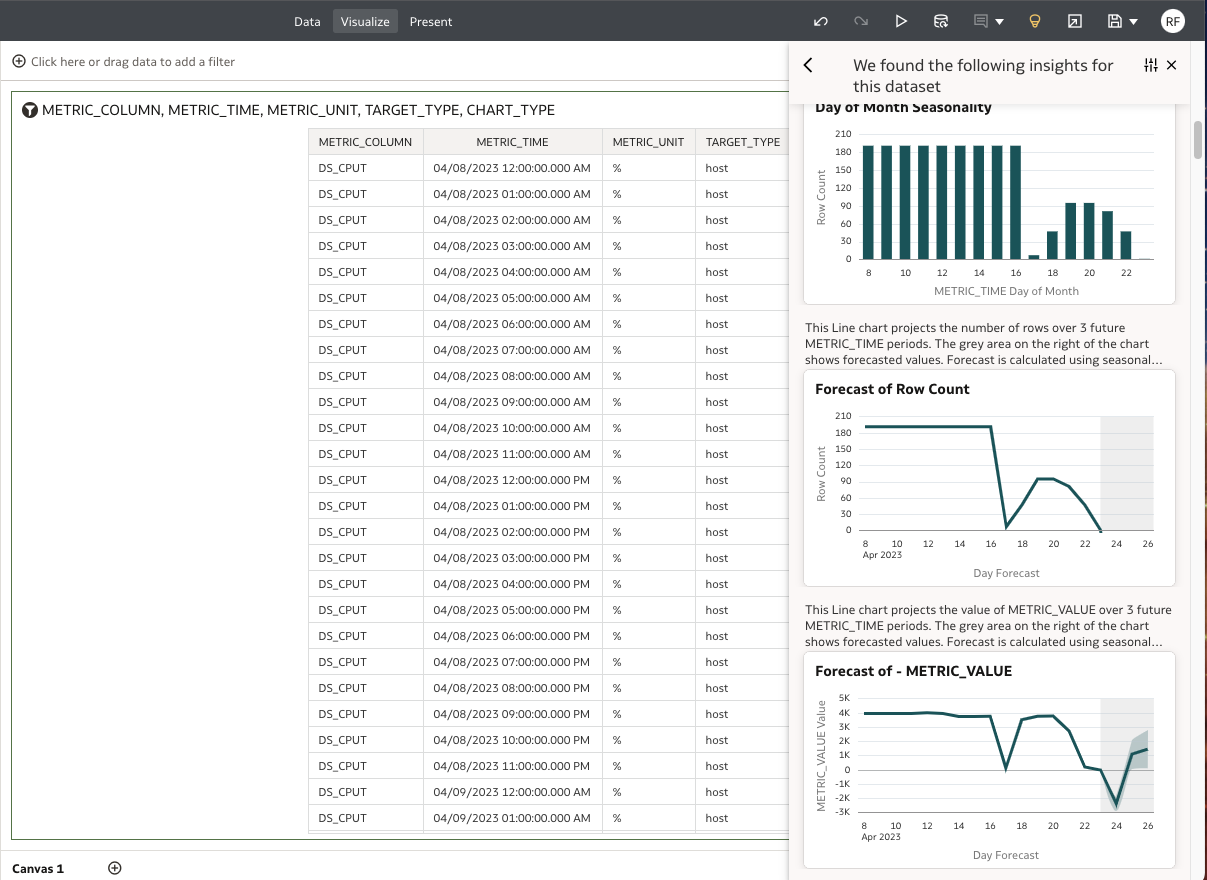
- Here is one example